
Choose the matching SNMP configuration
SNMP-capable Masterclock devices support SNMP v1, v2, and v3. Confirm feature availability on legacy hardware before attempting setup. Versions v1 and v2 are disabled by default and must be manually enabled before a manager can query using those versions. Use community settings for v1/v2, or the configured user, security, and context settings for v3.
Trap receiver addresses are the destinations for notifications; the manager’s Target Host is the device being queried.
Enable the SNMP Agent in WinDiscovery
- Open WinDiscovery and select the target device.
- Open the SNMP Control window.
- Use the Start control to enable the SNMP Agent.
- Optionally set identifying fields such as Name, Location, and Contact.
Configure community strings for SNMP v1/v2
- Manually enable the required SNMP v1 or v2 version in the device’s SNMP configuration. Starting the SNMP Agent does not replace this version check.
- In the SNMP Control window, review the available community values.
- If needed, define a custom community string.
- Set the active (current) community that your SNMP Manager will use when querying the device.
The SNMP Manager must use the same community value as the active community on the device.
Configure trap receivers if needed
- In the Trap Receivers area, enter the IP address of each system that should receive SNMP traps.
- Save the configuration.
Available traps depend on the model and firmware. For GMR6000 event definitions and notification limitations, see GMR6000 trap notifications. Verify the receiver using a supported test notification where available, then compare incoming notifications with the device’s current status. Traps arrive without a separate query for each event. A successful SNMP query does not by itself verify trap delivery.
SNMPv3 example in ManageEngine MIB Browser
In the supplied SNMPv3 example for ManageEngine MIB Browser, the Context Name must be set to admin. If this field is left blank or set to a different value, SNMP queries may not return data.
- Confirm that the settings below match the device’s SNMPv3 configuration. The values shown are the supplied example, not a verified default for every model or firmware version.
- Open ManageEngine MIB Browser.
- Click on the Gear icon to open MIB Browser Settings.
- Select v3 and set the Context Name to admin.
- Click the Add button at the bottom of the window.
- Enter Target Host IP address (IP address of the device to query).
- Enter User Name: mcv3user.
- Set Security Level to Auth, Priv.
- Set Auth Protocol to SHA.
- Set Priv Protocol to CFB-AES-128.
- Enter Auth Password/Priv Password to New^Horizon*.
- Set Context Name to admin.
- Click OK.
The Context Name must match exactly.
Next, import the Masterclock custom MIB into your SNMP Manager so Masterclock-specific objects appear with readable labels.
Browse MIB objects and perform an SNMP walk
- Expand the loaded MIB modules in the SNMP Manager.
- Select the Masterclock MIB tree and browse available objects.
- Run an SNMP walk to retrieve readable status objects from the device. Use an SNMP GET for an individual object where supported. This also provides access to available status that is not sent as an automatic notification.
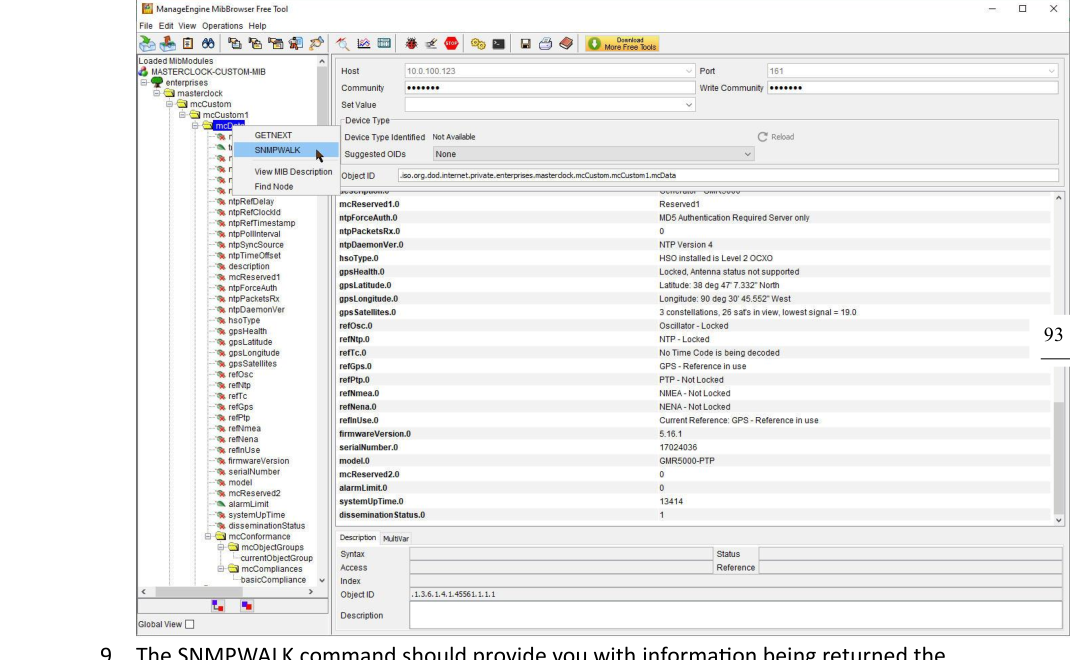
If a walk returns no data, check the Target Host address, enabled SNMP version and matching community or SNMPv3 credentials before changing MIB display settings.
Related articles
Article ID: KB-SNMP-002
KB Version: